WSL2で動いているサーバーに外からVPNでドメイン名でアクセスをしたときのメモ
グローバルIPを持つマシンをVPNサーバーにしてAndroidクライアントからWindowsクライアントのWSL2で動いているアプリケーションにドメイン名付きアクセスをする
WSL2SquidWindowsWireGuardAndroidこの手のことは自宅のルーターでポートを開けてやることが多いと思いますが、賃貸のネット環境が不自由なのと手元に物理的なモノを増やしたくない性分なので VPS を使うことにします。
解説というより詰まったところのメモです。
ここで書いてることは VPS を建てずとも Tailscale と CloudFlare Warp で実現できたりします。
完成図
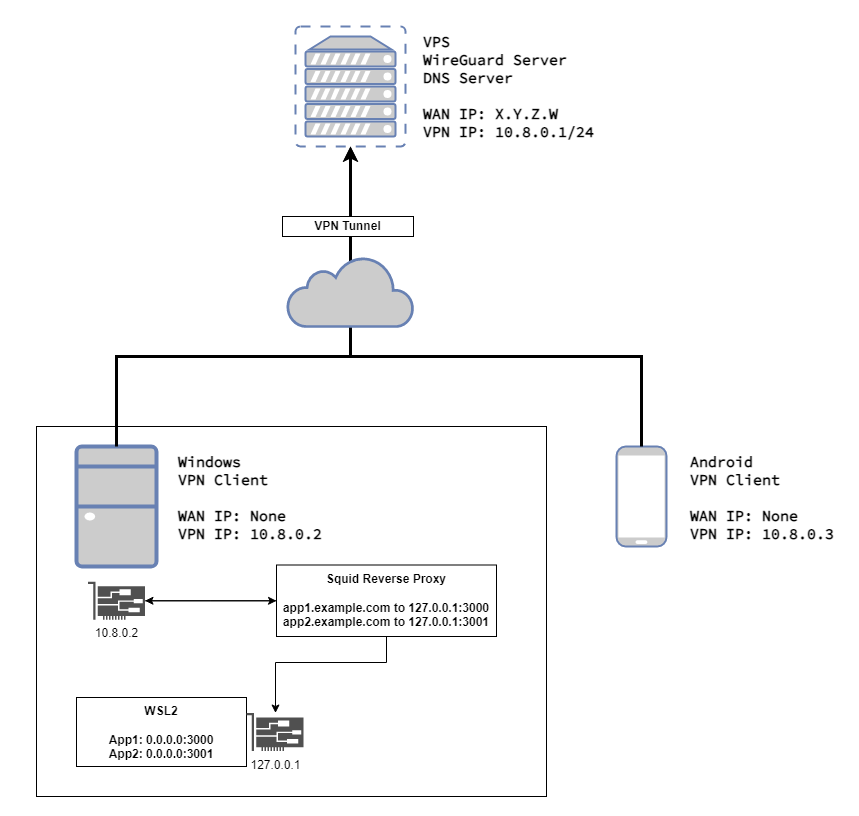
WireGuard 自体は P2P で繋がりますが今回は両クライアントとも NAT の奥にいるのでグローバル IP のサーバーを介する Hub and Spoke でやります。
WireGuard
シンプル故にセキュアで比較的速い VPN
config
デフォルトの 10.8.0.0/24 を使った例です
クライアントの先の LAN へのルーティングもありません。
サーバー
OpenVPN より項目が少ないので楽
公式の例だと Interface に PostUp, PostDown で iptables を実行していますが、手元ではあらかじめサーバーのファイアウォールで forwarding とインターネットに出る snat を有効にしているので書いていません。(OpenVPN 用の設定の使いまわし)
VPN 内で使う DNS は 10.8.0.1 にバインドしています。
[Interface]
Address = 10.8.0.1/24
ListenPort = ...
PrivateKey = ...
DNS = 10.8.0.1

# Desktop
[Peer]
PublicKey = ...
AllowedIPs = 10.8.0.2/32

# Android
[Peer]
PublicKey = ...
AllowdIPs = 10.8.0.3/32
クライアント Windows
Interface に使う IP と DNS を指定します。
Peer に接続先(サーバー)を設定します。
10.8.0.0/24 の通信のみで使っています。
[Interface]
PrivateKey = ...
Address = 10.8.0.2/32
DNS = 10.8.0.1, 1.1.1.1

[Peer]
PublicKey = ...
AllowedIPs = 10.8.0.0/24
Endpoint = ...
PersistentKeepalive = 25
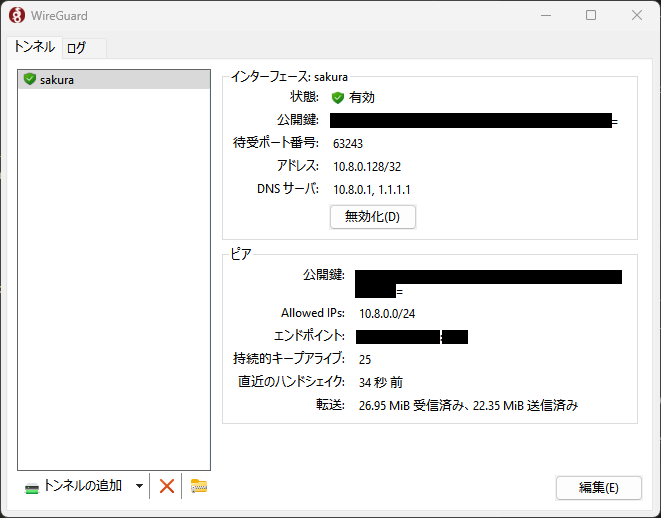
Windows の場合はメトリックの低い NIC に設定された DNS が優先されます。
繋いでみたところ WireGuard の NIC(ここでは sakura)のメトリックが低かったのでこの設定の DNS が使用されています。
> netsh interface ipv4 show interface

Idx     Met         MTU          状態                 名前
---  ----------  ----------  ------------  ---------------------------
  1          75  4294967295  connected     Loopback Pseudo-Interface 1
  4          25        1500  disconnected  ローカル エリア接続
 23          35        1500  connected     イーサネット
 21           5        1420  connected     sakura
 26        5000        1500  connected     vEthernet (WSL)
  9          25        1500  connected     イーサネット 3
WireGuard の接続がパブリックネットワークになっていた場合はこれをプライベートネットワークに変更します。 設定・コントロールパネルから変更できなかったので管理者権限の PowerShell を使います1。
> Get-NetConnectionProfile


Name                     : ネットワーク 2
InterfaceAlias           : イーサネット
InterfaceIndex           : 23
NetworkCategory          : Private
DomainAuthenticationKind : None
IPv4Connectivity         : Internet
IPv6Connectivity         : NoTraffic

Name                     : sakura 3
InterfaceAlias           : sakura
InterfaceIndex           : 21
NetworkCategory          : Public
DomainAuthenticationKind : None
IPv4Connectivity         : NoTraffic
IPv6Connectivity         : NoTraffic

> Set-NetConnectionProfile -Name "sakura 3" -NetworkCategory Private

> Get-NetConnectionProfile


Name                     : ネットワーク 2
InterfaceAlias           : イーサネット
InterfaceIndex           : 23
NetworkCategory          : Private
DomainAuthenticationKind : None
IPv4Connectivity         : Internet
IPv6Connectivity         : NoTraffic

Name                     : sakura 3
InterfaceAlias           : sakura
InterfaceIndex           : 21
NetworkCategory          : Private
DomainAuthenticationKind : None
IPv4Connectivity         : LocalNetwork
IPv6Connectivity         : NoTraffic
初回接続時に自身で選択したかは覚えていませんがパブリックになっていました。
設定を変えて WireGuard を繋ぎ直すごとに Name が別の NIC として作られているようです。
そのせいかここでは “sakura 3” となっています。
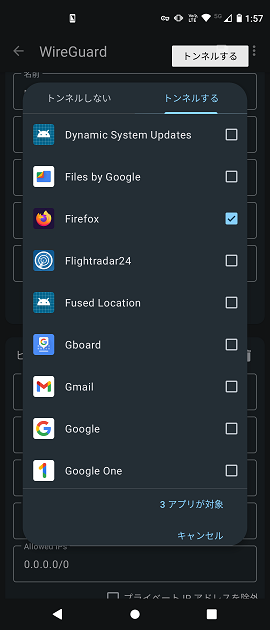
クライアント Android
Android では全部の通信経路を VPN 経由にします。
[Interface]
PrivateKey = ...
Address = 10.8.0.3/32
DNS = 10.8.0.1

[Peer]
PublicKey = ...
AllowedIPs = 0.0.0.0/0
Endpoint = ...
PersistentKeepalive = 25
Android はアプリごとに適用・除外を指定できるので普段は特定のブラウザやアプリを指定しています。
公衆 Wi-Fi 環境のために全部のアプリの通信を VPN 越しにすることもできます。
DNS
k8s でよく見る CoreDNS を単独で使います。
ゾーン・ファイル形式でも定義できますが単純に IP と紐づけるだけなので hosts 形式で書きます。
./
├─ coredns
|  ├─ Corefile
├─ pod-coredns.yml
Corefile
DNS 設定です。
example.com 以外はパブリック DNS に任せます。
Corefile
. {
  hosts example.com {
    10.8.0.1 server-app.example.com
    10.8.0.2 app1.example.com
    10.8.0.2 app2.example.com
    fallthrough
  }
  forward . 1.1.1.1 8.8.8.8
  errors
  loop
  reload
  whoami
}
立ち上げ
podman を使っています。
VPN 内だけで使うので UDP の 53 ポート を 10.8.0.1 にバインドして起動します。
./coredns ディレクトリをコンテナの /etc/coredns ディレクトリへマウントしています。
pod-coredns.yml
apiVersion: v1
kind: Pod
metadata:
  labels:
    app: coredns
  name: coredns
spec:
  containers:
  - name: main
    image: docker.io/coredns/coredns
    args: ["-conf", "/etc/coredns/Corefile"]
    volumeMounts:
    - mountPath: /etc/coredns
      name: coredns
    ports:
    - containerPort: 53
      hostPort: 53
      protocol: UDP
      hostIP: 10.8.0.1
  volumes:
  - name: coredns
    hostPath:
      path: ./coredns
      type: Directory
起動
$ podman play kube pod-coredns.yml
Pod:
2587bc245adf11546c38b0f91a82c3b88011a0d99d6057afee8099e3498695e6
Container:
fb9f5bc353dafd84f9de87ee8cf33ae8dbc4bb4d3d2a4a4da719b0fafa3c72ee

$ podman ps
CONTAINER ID  IMAGE                                       COMMAND               CREATED        STATUS            PORTS                                   NAMES
1cd60a63a3bc  localhost/podman-pause:4.3.1-1681198015                           5 minutes ago  Up 5 minutes ago  10.8.0.1:53->53/udp                     2587bc245adf-infra
fb9f5bc353da  docker.io/coredns/coredns:latest            -conf /etc/coredn...  5 minutes ago  Up 5 minutes ago  10.8.0.1:53->53/udp                     coredns-main

$ nslookup app1.example.com 10.8.0.1
Server:         10.8.0.1
Address:        10.8.0.1:53


Name:   app1.example.com
Address: 10.8.0.2
CoreDNS 直接起動する場合にバインドアドレスを変える場合は https://coredns.io/plugins/bind/ を使います。
WSL2 / Squid
WSL2 でポート公開したサーバーは 0.0.0.0 をバインドしても Windows のローカルホストからしかアクセスできません。
これに対して netsh interface portproxy add によるポートプロキシで転送する方法もあります2 3。
今回はアクセスドメイン名で振り分けたいので https://squid.diladele.com/ を使うことにします。
Console App SQUID FOR WINDOWS を選びます。
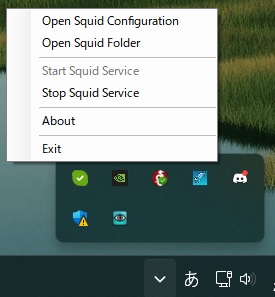
インストールするとトレイに現れます。
Windows ファイアウォールで許可をします。WireGuard からアクセスできればよいので先ほど設定したプライベートの方を許可します。

トレイから
Open Squid Configuration で squid.conf がメモ帳で開きます。
Open Squid Directory で squid.conf があるディレクトリが開きます。
以下はリバースプロキシのために変更・追加した行です。
VPN の IP の 80 番で受けることにします。
-http_port 3128
+http_port 10.8.0.2:80 accel
例4にならいドメインで振り分けます。
+ cache_peer 127.0.0.1 parent 3000 0 no-query originserver proxy-only name=app1
+ acl sites_app1 dstdomain app1.example.com
+ cache_peer_access app1 allow sites_app1

+ cache_peer 127.0.0.1 parent 3001 0 no-query originserver proxy-only name=app2
+ acl sites_app2 dstdomain app2.example.com
+ cache_peer_access app2 allow sites_app2
トレイのアイコンから Squid をスタート・ストップ、または管理者権限を持った PowerShell から Squid バイナリを実行で設定が反映されます。
PS C:\Program Files\Squid\bin> .\squid.exe -k reconfigure
完了
これで Android クライアントから DNS サーバーに app1.example.tld を問い合わせて帰ってきた IP アドレス で Windows クライアント 10.8.0.2 の WSL2 で建っているポート 3000 番のアプリサーバーにアクセスできました。
脚注
-
https://pc-karuma.net/change-network-to-public-or-private-on-windows-11/ ↩
-
https://learn.microsoft.com/ja-jp/windows-server/networking/technologies/netsh/netsh-interface-portproxy ↩
-
https://rcmdnk.com/blog/2021/03/01/computer-windows-network/ ↩
-
https://wiki.squid-cache.org/ConfigExamples/Reverse/MultipleWebservers ↩