gRPC互換のconnect-goで通信ができるシングルバイナリを作る
Go言語でgRPC実装のconnect-goによるAPIサーバー、go:embedで埋め込んだVueフロントページ配信ができるバイナリを作る
(Update ) Goconnect-goVueViteGitLinux追記
https://github.com/bufbuild/connect-go
Development of this package has moved to connectrpc/connect-go. The new import path is connectrpc.com/connect.
パッケージバスが bufbuild から connectrpc へ移動したため更新
リポジトリ
https://github.com/yszkst/connect-go-embed-vue
参考
一度チュートリアルを実践することをお薦めします。
- Connect Docs - Connect for Go - Getting started
- Connect Docs - Connect for Web - Getting started
- 今回は remote package は使用しません
gRPC, connect-go について詳しく書かれている記事があるのでこちらを参照してください。
- Better gRPC な Connect に乗り換える - Go 言語編
- 【gRPC】Connect が作られた背景概要/これまでの gRPC-Web/Connect でできること
- Protocol Buffers のコード生成を protoc から Buf に移行しました
- grpc-gateway で gRPC と REST 両対応のサーバを作る
要件
- TCP が開いてるサーバーに置いてブラウザ越しに操作できるもの
- RHEL Cockpit のようなもの
- スキーマ駆動
- ストリーミング対応
- バイナリひとつで済む
GUI アプリを X11 Forwarding は考えないものとします
Go の理由
言語・ランタイムは星の数ほどあります。
今回はコンパイルしてネイティブバイナリになり、 go:embed で静的ファイルを埋め込むことができる Go を使います。
connect-go の理由
HTTP 越しに API を生やすならスキーマ駆動でシリアライズも面倒見て欲しいと思うのが人の常なのでいくつか方法を探します。
この中で要件を満たすのは GraphQL, gPRC-web + gRPC-gateway, connect-go です。
GraphQL の柔軟なクエリ機構は不要で、gRPC に関して後発で扱いやすくなっている connect-go を使うことにします。
OpenAPI/Swagger
https://github.com/deepmap/oapi-codegen
OpenAPI 仕様の json/yml ファイルを API ドキュメントとします。
API ドキュメントからサーバー用インターフェース、クライアントコードを出力できます。
API ドキュメントはサーバーの実装から生成することもあります。
REST API 向けなので websocket などのような非同期通信は対象外です。
GraphQL
GraphQL Schema で API と API の扱うモデルを定義します。
取得項目(のフィールド)をリクエスト側で宣言する Query が存在するのも特徴です。
Subsription により非同期も仕様に含まれています。
gRPC-go / gRPC-web
https://grpc.io/docs/languages/go/
https://grpc.io/docs/platforms/web/
Protocol Buffers で API と API の扱うモデルを定義します。
バイナリプロトコルなので非ブラウザ間で高効率な通信を実現できます。
ブラウザとの通信には NGINX または Envoy プロキシを挟むか、gRPC-gateway を Go で使い、ブラウザからは gRPC-web を使います。
connect-go / connect-web
https://connectrpc.com/docs/go/getting-started/
https://connectrpc.com/docs/web/getting-started/
Protocol Buffers を使うのは gRPC-go と同じです。
通信プロトコルは gRPC, gRPC-web, Connect (HTTP ベース) から選べます。
ブラウザからは connect-web を使います。(protoc プラグイン名は connect-es)
スキーマ定義のレジストリ BSR (Buf Schema Registry) を用意しています。
実装
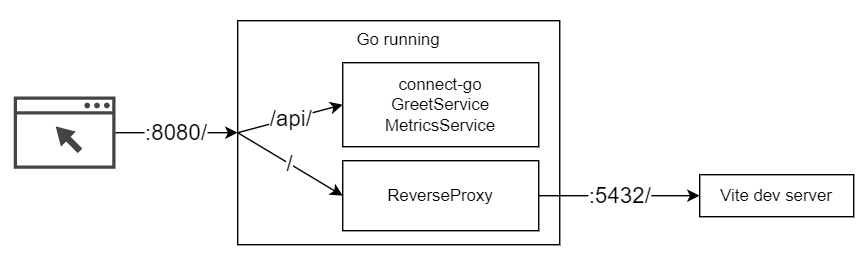
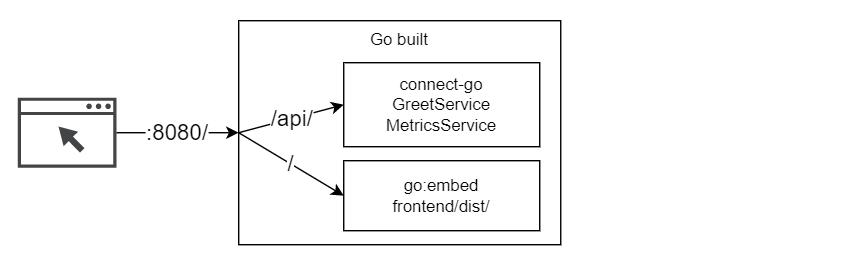
動作イメージ
Dev Mode
Production Mode
ディレクトリ
今回はトップレベルにエントリポイントの main.go と プロトコルバッファ定義の api を置いています。
go-connect-embed-vue/
├─ api/        ProcolBuffers定義 ← ← ←
├─ frontend/                         ↑
│  ├─ api/     シンボリックリンク → → →
│  ├─ dist/    フロントビルド結果
│  ├─ gen/     connect-web 生成コード
│  ├─ public/
│  ├─ src/
│  ├─ buf.gen.yaml
│  ├─ index.html
├─ gen/        connect-go 生成コード
├─ buf.gen.yaml
├─ buf.yaml
├─ main.go
Protocol Buffers・コード生成
Proto ファイル
UnaryCall(単独のリクエスト・レスポンス)の SayHello サービスと ServerSideStreaming の Metrics サービスを定義します。
定義ファイル配置
├─ api/
│  ├─ v1/
│  |  ├─ metrics.proto
│  |  ├─ sayhello.proto
├─ buf.gen.yml
├─ buf.yml
sayhello.proto
syntax = "proto3";

package api.v1;

option go_package = "connect-go-embed-vue/gen/api/v1;apiv1";

message SayHelloRequest {
  string name = 1;
}

message SayHelloResponse {
  string reply = 1;
}

service SayHelloService {
  rpc SayHello(SayHelloRequest) returns (SayHelloResponse) {}
}
metrics.proto
syntax = "proto3";

package api.v1;

option go_package = "connect-go-embed-vue/gen/api/v1;apiv1";

message CpuUsageStreamRequest {
}

message CpuUsageStreamResponse {
  float percent = 1;
}

service MetricsService {
  rpc CpuUsageStream(CpuUsageStreamRequest) returns (stream CpuUsageStreamResponse) {}
}
buf.yaml
version: v1
breaking:
  use:
    - FILE
lint:
  use:
    - DEFAULT
buf.gen.yaml
version: v1
plugins:
  - plugin: go
    out: gen
    opt: paths=source_relative
  - plugin: connect-go
    out: gen
    opt: paths=source_relative
Go の命名規則により go_package オプションはコードが生成されるディレクトリに紐づく必要があります。
Streaming で空のリクエストを使っていますが lint ルールに リクエスト・レスポンスメッセージには rpc名(Response|Request) を使うことが定められているので google.protobuf.Empty は使えませんでした。
Connect のチュートリアルでは
├─ サービス名/
│  ├─ バージョン
|  │  ├─ サービス名.proto
のようになっています。
2 個のサービスを
├─ サービス名1/
│  ├─ バージョン
|  │  ├─ サービス名1.proto
├─ サービス名2/
│  ├─ バージョン
|  │  ├─ サービス名2.proto
のように並べるのはトップにディレクトリが増えてしまい、あるいは
├─ buf/
|  ├─ サービス名1/
|  │  ├─ バージョン
|  |  │  ├─ サービス名1.proto
|  ├─ サービス名2/
|  │  ├─ バージョン
|  |  │  ├─ サービス名2.proto
のようにまとめようとしましたが階層やパッケージ名が深くなったので api/v1/サービス名.proto の形にしました。
Connect の提供している Buf Schema Registry を利用する場合はサービスごとにトップレベルで分けた方が行儀が良いかもしれません。
本当は内側で閉じているので v1 ディレクトリも不要なのですが、lint ルールで必須でした。
Go
https://connectrpc.com/docs/go/getting-started/#install-tools にしたがってツールをインストールすると buf コマンドが使えます。
lint は buf lint で行います。
buf.gen.ymlに従いbuf generate で proto ファイルを探して gen/ 以下に同じ階層で Go コードを生成します。
生成コード
├─ gen/
│  ├─ api/
│  |  ├─ v1/
│  |  |  ├─ apiv1connect
│  |  |  |  ├─ metrics.connect.go
│  |  |  |  ├─ sayhello.connect.go
|  |  |  ├─ metrics.pb.bo
│  |  |  ├─ sayhello.pb.bo
トップレベルのディレクトリ(api)がそのまま出力先のディレクトリ(gen)の下につき、さらにconnect用パッケージが加わります。
出力先のディレクトリは buf.gen.yaml の各 plugin の out で指定します。
version: v1
plugins:
  - plugin: go
    out: gen
    opt: paths=source_relative
  - plugin: connect-go
    out: gen
    opt: paths=source_relative
ここで
out: .
とすると proto ファイルのある api/ディレクトリにコードが生成されます。
個人的には api/ディレクトリにまとめられる方が扱いやすい気もしましたが Vite(rollup) のビルドで対象ファイルの実体が上位のディレクトリにあるとビルドできなかったのでこの形になりました。
TypeScript
あらかじめ frontend/ ディレクトリに Vue プロジェクトを作成しています。
TypeScript コード生成用のツールを frontend/ に閉じ込めたかったので Proto 定義をシンボリックリンクで参照します。
go-connect-embed-vue/
├─ api/        ProcolBuffers定義 ← ← ←
├─ frontend/                         ↑
│  ├─ api/     シンボリックリンク → → →
|  ├─ buf.gen.yaml
buf.gen.yaml
# buf.gen.yaml defines a local generation template.
# For details, see https://buf.build/docs/configuration/v1/buf-gen-yaml
version: v1
plugins:
  - plugin: es
    out: gen
    # With target=ts, we generate TypeScript files.
    # Use target=js+dts to generate JavaScript and TypeScript declaration files
    # like remote generation does.
    opt: target=ts
  - plugin: connect-es
    out: gen
    # With target=ts, we generate TypeScript files.
    opt: target=ts
https://connectrpc.com/docs/web/getting-started/ に従って入れたツールによって npx buf generate で TypeScript クライアントコードを生成できます。
生成コード
go-connect-embed-vue/
├─ frontend/
│  ├─ gen/
|  |  ├─ api/
|  |  |  ├─ v1/
|  |  |  |  ├─ metrics_connect.ts
|  |  |  |  ├─ metrics_pb.ts
|  |  |  |  ├─ sayhello_connect.ts
|  |  |  |  ├─ sayhello.ts
API サーバー
できあがった Go ファイルから実装を作っていきます
main.go (サーバー実装部分以外省略)
import (
	"connectrpc.com/connect"

  apiv1 "connect-go-embed-vue/gen/api/v1"
	"connect-go-embed-vue/gen/api/v1/apiv1connect"
)


type SayHelloServer struct{}

func (s *SayHelloServer) SayHello(
	ctx context.Context,
	req *connect.Request[apiv1.SayHelloRequest],
) (*connect.Response[apiv1.SayHelloResponse], error) {
	res := connect.NewResponse(&apiv1.SayHelloResponse{
		Reply: fmt.Sprintf("Hello, %s!", req.Msg.Name),
	})
	return res, nil
}

type MetricsServer struct{}

func (s *MetricsServer) CpuUsageStream(
	ctx context.Context,
	req *connect.Request[apiv1.CpuUsageStreamRequest],
	stream *connect.ServerStream[apiv1.CpuUsageStreamResponse],
) error {
	for {
		percent, errPercent := cpu.Percent(1*time.Second, false)
		if errPercent != nil {
			log.Println(errPercent)
			return connect.NewError(connect.CodeUnknown, errPercent)
		}

		err := stream.Send(&apiv1.CpuUsageStreamResponse{
			Percent: float32(percent[0]),
		})
		if err != nil {
			log.Println(err)
			return err
		}
	}
}
単純に返すパターンとストリーミングで返すパターンです。
スキーマに則ってリクエスト・レスポンスに値を取り出し・格納ができます。
エラー情報に使える値はドキュメントを参照してください。
HTTP ステータスコードではなく独自の値を使います。
フロント
lib/api.ts
import { createConnectTransport } from "@connectrpc/connect-web";
import { PromiseClient, createPromiseClient } from "@connectrpc/connect";
import type { ServiceType } from "@bufbuild/protobuf";

const transport = createConnectTransport({
  baseUrl: "/api/",
});

// NOTE: https://connect.build/docs/web/using-clients#managing-clients-and-transports
const memo = new Map();

export function getClient<T extends ServiceType>(service: T): PromiseClient<T> {
  if (memo.has(service)) {
    return memo.get(service)!;
  }

  const client = createPromiseClient(service, transport);
  memo.set(service, client);
  return client;
}
SayHello.vue (setup scriptのみ)
import { ref } from "vue";

import { SayHelloService } from "../../gen/api/v1/sayhello_connect.ts";

import { getClient } from "../lib/api";

const client = getClient(SayHelloService);

const name = ref("");
const rep = ref("");

async function sayhello() {
  const res = await client.sayHello({ name: name.value });
  rep.value = res.reply;
}
Stream.vue (setup scriptのみ)
import { onBeforeUnmount, ref } from "vue";
import { ConnectError, Code } from "@connectrpc/connect";
import { MetricsService } from "../../gen/api/v1/metrics_connect";
import { getClient } from "../lib/api";

const client = getClient(MetricsService);

const abortCtl = ref(new AbortController());

const percent = ref<number | null>(null);

onBeforeUnmount(() => {
  stopStream();
});

async function startStream() {
  stopStream();

  try {
    for await (const res of client.cpuUsageStream(
      {},
      { signal: abortCtl.value.signal }
    )) {
      percent.value = res.percent;
    }
  } catch (err: any) {
    if (err instanceof ConnectError && err.code != Code.Canceled) {
      console.error(err);
    }
  }

  percent.value = null;
}

function stopStream() {
  if (!abortCtl.value.signal.aborted) {
    abortCtl.value.abort();
  }
  abortCtl.value = new AbortController();

  percent.value = null;
}
この例では不要ですがクライアントインスタンスは使いまわせるので NOTE のリンク先の React で useMemo を使っていた形にならいます。
SayHallo は単純ですね。用意されたメソッドを使うだけです。 Stream は AsyncGenerator で受け取れます。
AbortContorller でキャンセルできます。
ただし、クライアント側で接続を切っているだけなので Go からは stream.Send 呼び出し時点で送信先が無いことのエラー
(例) unknown: write envelope: write tcp [::1]:8080->[::1]:38806: write: broken pipe
になります。停止用の仕組みを作った方が後々で判別しやすいかもしれません。
静的コンテンツ
フロントのビルド結果は frontend/dist に出力されます。
これを go:embed で埋め込みます。
//go:embed frontend/dist/*
var static embed.FS

func main() {
  ...
  if isDev {
		log.Println("[Dev] proxy vite dev page.")
		frontProxy := &httputil.ReverseProxy{Director: func(req *http.Request) {
			req.URL.Scheme = "http"
			req.URL.Host = ":5173"
		}}
		mux.Handle("/", frontProxy)
	} else {
		log.Println("[Prod] serve embed source.")
		documentRoot, err := fs.Sub(static, "frontend/dist")
		if err != nil {
			log.Fatal(err)
		}
		mux.Handle("/", http.FileServer(http.FS(documentRoot)))
	}
開発中は ReverseProxy で Vite に飛ばし、ビルド後の実行は埋め込んだファイルを配信します。
go:embed の注意点としてビルド時にコメントで指定したパスに実体が存在することと、実体が Go ソースのディレクトリ以下にある必要があります。
サンプルリポジトリでは make prepare で dist を置いています。
cmd/main.go のように Go ソースを別階層に置くことにして dist の親で無くなった場合は開発・Go ビルド前に dist を適切な階層にコピーすることが必要になります。
ビルド
go build main.go で作られるバイナリ main を実行するだけです。
その他
Dev ビルドは Live Reload にAir を使用しています。
終わり
フロントエンド込みのシングルバイナリ、APIスキーマ定義、ストリーミング通信対応で GraphQL ほど厚いものは不要なときに Connect-go で作ってみるのもいいかもしれません。